Pages

Sunday, January 24, 2010

I wanted to say thank you to RayMarArt.com  for sending us the panels for our class.  Everyone has enjoyed them and they are great for transporting back and forth to classes.


Here is the still life from the last class.  Some of you wanted to attempt painting glass.  Go for it and see if you can capture the reflections of the glass and the background coming through.  What you want to do is put in the background color first and the block in where you want the top and bottom of vase to be and position of the rose.  You don't want to paint in the exact shape of the vase, only the highlights and reflections you see on it.  If you are wanting to work on this technique, let me know and I'll go over it.


What beautiful masterpieces!!!


I think Carrita is just about done with hers.
One of the hardest things to do is to know when your done with a painting.
Carrita, put down the brush and walk away from the painting.  (It's beautiful girl, frame it)


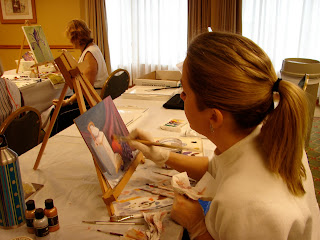
Deborah, is laying in the final details of her masterpiece.

That's all for now,  more photos next post.

Monday, January 18, 2010

Here is the painting I was talking about that I felt coming on.  I wanted to do a larger version of the one we did in class and add a few other elements to the composition.

I just started it.  What I did is tone it with a gold metallic gesso.  Let it dry.
I placed the objects on my canvas. and started to block in the darks.


Next I started putting in some of the colors.  I like to start with the red of the apples to get things going.  It makes the painting exciting.


I'm going to put in the wooden plate that we used on the last painting.  Also, I'm going to change the grapes to green.  I think it would complement the red apples better.  In the next photo, I have put in the design of the teapot and all of the gold areas that you see is what I "scratched" out.  Since the under painting of the canvas was gold.  I took a bamboo stick and rub out tool ( I'll show you in the next class) and scratched out the areas of the metal handle, the edges of the teapot trimmed in gold and I added leaves and vines so I scratched out them too.  This gives it a little different look to it.  But I'm not finished.


Here are some close ups


Here is where I left off.  I'm going to go back where I "scratched" out and put a glaze(with liquin) on some of the areas and make the vines and leaves more like vines and leaves.  But you have to to the scratching out on the first session while its wet. I also went ahead and signed it by scratching out even though I'm not done with it yet.


I didn't put in the fabric background this time. I may still put it in, not sure.  I'm kind of liking the whimsical swirls of the vines and leaves though.  I just might leave them alone.  We'll see.


Sunday, January 17, 2010

I went back over the base colors of the teapot so that it would be wet when I put in the design details on it.  I wanted it to be impressionistic looking and blend it and not have very sharp edges.  I sketched in the handle with vine charcoal.  I worked on the background some and put in little splashes of muted color so it would give the impression of a pattern on the backdrop.


Below I worked on the grapes.  I didn't like them as dark as they were so I lightened them up a little with purple,crimson and a little white.  They still need a dark middle to them, but you need to put in some lighter color at the bottom and some at the top of the grape to give a translucent look to them.  When they are dry go back and add a touch of white for a highlight where the light source hits them.  You can also see where I put in the lace edge of the cloth.  I just did this with white and a touch of blue.  When it dried I went back with a dark color (blue, purple& burnt sienna) and hit the edges a little to give the impression of a shadow underneath the lace.


Here is a close up of the teapot after I put in the handle and highlights.  I feel another painting coming on.  I think I'm going to do the teapot again but have a gold underpainting and scratch out the areas where the gold and metal are on the teapot.  


I brightened the red of the apple and put in the highlights on it as well. Also on the garlic.  If you look real close on the garlic you will see the blue and purple I put in there.  I was trying to make my shadows cool colors since I had a warm light on it.


Here is the finished painting.  I will probably put a coat of liquin on it when it dries so it will have a completed finish.


Bring you paintings back to class on Wed and we will work on them some more.
Plus if there is something at you home that you would like to put into a painting, bring it and we will see if we can put it in a still life.  If you want make one of those little things I made out of foam core so you can bring it to class and make your own still life.  You can also use a box on its side.

See you wed.

Debra


Saturday, January 16, 2010


Here are the beginning steps of my still life we started in class.  I forgot my printed out reference photo (again) and forgot my camera this time.  So I took the pictures with my iphone.  Don't know what kind of quality they will turn out to be.


This is where I left off in class.


I darkened the background, worked on putting some colors into the garlic so it will stand out from the pot and cloth.  I went over the grapes with a little more color.  I think I may even make them more of a red burgundy color before I finish.  I put in some of the draped fabric of the background.  I will put in a blurred pattern on it later.


Close up of the colors I put into the garlic.


I'm thinking I may add another apple to the mix.  Not sure yet.

OK, got to get to painting the rest of it.


Thursday, January 14, 2010


Here are the photos of the still life we worked on yesterday.  Try to work on them during the week.


I will work on mine today and post the different steps so you can see them.  Get to painting!


Friday, January 8, 2010


Here is the painting I did in the class on Wed.  I didn't really get to do a whole lot to it during class in trying to get around to everyone.  I finished it Thursday on my painting day.

When I looked at, immediately I didn't like all the white going on so I wanted to make the vase a more cream color. Of course, I printed out the photo of the still life to take with me for a reference and forgot to take it with me.  Soooo,  I just kind of winged it.  I know I wouldn't remember the exact pattern on the vase and position of the apples.  So I just tried to make what I had in front of me a painting that worked.


I started by making the background behind the apples darker to make them "pop" out more.  I lightened the plate a little so I could make the shadow darker underneath, yet not too light so I could still put a hint of a highlight on the top of it.  Its wood so the highlight on it won't be too intense.


I worked on making the vase more cream color worked on the fabric folds and shadows, and the pattern on the vase (this is where I just made it up).


I went ahead and put in the highlights on the apples and vase.  I thought these pictures were clearer than this when I took them.  Sorry.


I'm still not happy with the folds of the fabric.  I will probably work on this a little more.  I never did put in the leaves, which I may do later.  If I have time I am going to start another painting of this.
I just want to get across to everyone that you may need to give and take in the composition of the painting.  You can add to take away as you prefer.  Don't be a slave to the photo or set up in front of you.  Sometimes after you get the objects on your canvas it doesn't work as they did when you set up the still life.  This is the creative part.  Make Art.

Bring any paintings you may have started this week to our next class.  We'll have show and tell for just a bit if you like.

See you then,

Debra

Thursday, January 7, 2010

I hope all of you enjoyed the class yesterday.  Sorry for the bitter cold!!! I'm sure next week will be warmer.   

I want it to be fun. My whole goal is to get people painting and get over that fear of trying to do it perfectly each and every time.  Very few artist create a masterpiece every time they paint.  You just think they do because their mistakes are hidden deep in their closets and you NEVER see them.  Just think, some of you came in yesterday and said I haven't painted in years or I've never picked up a brush.  Now you can't say that any more.  You jumped in and did it.  Now you just have to keep working at it.  To me painting is such a stress reliever and if you let it, it can be for you too.  It's such a nice addition to life that makes it sweeter.  We are bombarded and overwhelmed with our daily lives of news 24/7, junk mail, schedules and such and to make time to paint just gives you a more balanced life.  And as you see, yesterday we went way over our class time before we knew it.  You can totally get lost in it and loose track of time (which can be good or bad).  Sometimes we need to set a timer.  Anyway...

Here are the photos of the still life from my class yesterday.  Many of you wanted me to post them so you could work on your paintings this week.  I took a photo from 3 different angles.  The first 2 photos are from the same angle but one I zoomed in more than the other.  Pick which one is the right angle for where you were sitting.  It would be great if you have a chance to work on it during the week but don't feel bad if you don't get to it.  But I've been getting emails from some of you that say you wanted these pictures up because you can't wait to get to paint on them today.  So, Paint Away!!!  If you like, choose another angle and try to repaint it on a different canvas.  Practice, practice, practice.


This one is from the middle of the room.

Same side just zoomed in more.

This is for those of you who were on the left side of the room.

This one is for those of you on the right side.


I will work on mine today and hopefully I will remember to take pictures as I go along.  Then I will post them during the week so you can see my progression in finishing the painting.  I may even start another canvas and paint it again.  Not because I don't like what I did,  Just to do it from a different angle or to make my objects larger or smaller.  Some paintings I have painted 4 different times.  Not that I didn't get the results I wanted but because It was just a little bit different take on the subject matter.  I ended up with 4 very different paintings.  Each of which I was very pleased with.  


So, most importantly don't get frustrated or give up.  Press on.  I think some of you might have had very high expectations of yourself yesterday.  Be patient.  Have fun with it.  And keep painting.  Next week it will move a little faster.  The first day is always difficult.  You have several people on different levels and everyone needs to sort out and situate things.  That takes time.  If you have a pallet that has a lid on it, you may want to put out your colors on it before you come to class.  That will save some time.  Now that you kind of know what to expect and what and how you need to do things, do as much of that before class and we can get moving quicker and get more accomplished next week.


Next week bring in your paintings and extra canvases.  We can work on them or if you would like to move on, I will have another still life set up and you can get to working on that.  If you have something that you would like to paint, bring it in and we will see if we can incorporate it into a still life or set one up just for you to do.  


Also, I'm sure you have thought of some questions since class was over.  Email them to me and I will make a list  and address them at the next class.


See you next week,


Debra

Tuesday, September 29, 2009

Well, its been a while.  I have been very busy planning our next Kingwood Art Society Fall Art Show coming up Nov 7th.  Go to my website DebraLatham.com or KingwoodArtSociety.com for all the info and registration forms.

This is what I've been working on lately.


This is Gus our newly acquired Shih Tzu.  He's in trouble right now.  Does anyone have any pointers on house training a Shih Tzu.  I have read they are very stubborn.  I believe it.  But how can you stay upset with such a cute little face.

This is Fonzie, Gus's little buddy.  Not sure if Fonzie is in complete agreement with that.


I showed you in an earlier post of some of the places I went out to in Austin with PleinAirAustin.org  I decided to repaint that bridge again and bigger.  Tweak it here and there.
This is the sketch.


Here I have put in some of the darks.


This is almost complete I have noticed that the rocks line up too much in a straight line.  I'll work on varying that up a little and add a few more highlights.

Until next time.

Monday, August 31, 2009

I went out again with the Plein Air Austin group again a couple of weekends ago.  We had a wonderful time.  Although it was very muggy even at 8am.  
This was on Lost Creek.  I would have never known this was here if it hadn't been for this group.


I'm still trying to get the hang of it.  I think I need to take a workshop on plein air painting.  Practice, practice, practice.


It is absolutely beautiful here.  I'm sure there are some pretty parts of Houston (where I live) but you really have to search them out.  In Austin (and surrounding areas), any where you look is scenic.  ( I may have already mentioned this but its worth mentioning again.)

This is a lady in the group doing water color.  I'm still trying to get all the names down.  I think it was Jane. Nice work.


I think it will be a couple more weeks before I can go out with them again.  
So until then,

God Bless

Tuesday, August 11, 2009

What a weekend!  This was my first attempt at true plein air painting.  I recently joined the Plein Air Austin group.  We go to Austin a couple times a month anyway so I decided to join and go out with them as much as possible.  This was a little bridge in the middle of the down town Austin area that we met at.  It was beautiful.  You don't really see it from the street as you drive by and would never know it was there.
There was a homeless man on the other side of this wall.  He looked perfectly content.  I think this is where I would chose to be if I were homeless.


This was my attempt at painting the bridge.  You could tell the others were experts at this.  I stayed toward the back of the group so they couldn't tell what an amateur I was.  At one point I was going to move my easel across the creek to get a different view.  A rock I stepped on moved and my foot went into the water I finally caught myself and saved the easel and paint box from going into the water.  I know I looked like" Lucy" trying to paint.  Anyway we had a very good time.  It was fun, peaceful and educational.

I started another one while I was there but everyone started packing things up and I didn't want to be the only one there so I took a few pictures and I'll finish it first chance I get and show it to you.  (If it turns out O.K.)


Well, my cows aren't pigs anymore but my husband said they are starting to look like horses.  So I've got a little more work to do on them.

Till next time.